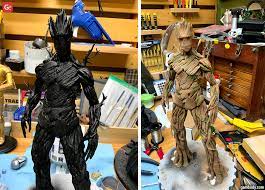
Painting 3D Prints How to Do It Right
Painting a 3D print is the best way to make your design look polished and visually appealing. You can also add additional painted details. To start painting, you don’t just start rubbing or spraying it onto the print after 3D printing – there are important steps you need to follow before, during, and after painting to get professional results. Before we move on to the steps, let’s examine the main benefits of 3D printing paint.
Smooth Finish: Painting is one of the best finishing strategies you can use to create a smooth and aesthetically pleasing surface on your 3D print.
Protection: Paint can also act as a protective layer, making the 3D print less susceptible to damage from environmental factors such as UV radiation and moisture, therefore more durable than if not painted It happens.
Ability to customize the look of your designs: Various paints are available to 3D print. You can choose from a wide range of colors or combine different colors, making it easy to personalize your 3D printed objects to your needs and make them unique.
Visual Impact: Painting can add a personal touch to your designs and make them stand out and realistic. When you use the right combination of colors, the 3D print will also look professional.
Hide imperfections: If your print has some problems, painting can help hide them.
If you use spray paint, hang the 3D print somewhere before spraying; A wire or a cord might work well. If you use solid or liquid paint, you can put your design on newspaper to avoid the mess.
remove the support and other unwanted parts
If your model has support for 3D printing, you can remove them with a knife or pliers. Do this slowly to avoid damaging other parts of the print. Also, make sure that the tool you are using is sharp and use it carefully to avoid hurting yourself in the process.
You can also wear gloves to protect your hands from any sharp edges. After removing the backing, you can examine the print to see if any other unwanted parts remain and remove them.
smooth 3d print
To properly smooth your 3D print, you need to use sandpaper. You can use a general-purpose sandpaper sheet or Amulo fine grit sandpaper which works for a variety of materials including plastic.
To smooth the print, start by rubbing the sandpaper in slow, circular motions to make sure you’re evenly removing all the blemishes and ridges that may have built up during the printing. You should only use light pressure, as rubbing too hard can damage the delicate and vulnerable parts of the 3D print.
However, you may need to apply pressure when sanding some parts—for example, the bottom of the 3D print that sticks out from the bed—as they sometimes leave with a number of rough surfaces after removal.
wash the 3d print
After sanding, use water with a mild detergent to clean away any dirt or debris from your 3D print. Additionally, you can dip your model in isopropyl alcohol as this can help remove small and stubborn imperfections left during sanding, giving it a smoother finish. Use a damp cloth to wipe the print and leave it for a few minutes to dry completely before moving on to the next step.
prime the 3d print
Before applying paint, it is essential to start with a coat of primer to help the paint adhere properly by creating an even, smooth surface. Applying a primer to the design also helps to fill in any imperfections, such as scratches or blemishes, that may have occurred during the sanding and washing steps.
Vallejo Surface Primer is an excellent all-purpose primer for any 3D print. It is water soluble, easy to apply and comes in a variety of colours. Use a brush to apply it and wait for it to dry completely before moving on to the next step of painting.
paint 3d model
There are a number of paints available that you can use, depending on the type of finish and color you want. You can use Montana spray paint or Caliart acrylic paint sets for manual painting.
Hold the can at least six inches away from the model and spray continuously. Be sure to cover the entire surface of the model evenly. If there is any part you don’t want the spray to touch, you can mask it off using tape and remove the tape after you finish painting.
If you’re using liquid paint, use a brush to do the job. Like spray-painting, you can use masking tape to hide areas you don’t want the paint to touch.
In addition to covering areas with tape, it is also good practice to cover your work area with newspaper or plastic wrap to keep it clean.

